

How to set up an online store? This question, which can evoke anxiety, especially among those who don’t feel too comfortable in the world of new technologies. If you’re wondering how to navigate through the technical process and embark on your e-commerce adventure, you’re not alone. On our blog, we’ve already helped hundreds of users open their online stores, which means you’re in good hands.
In this article, we’ll present you with a simple and accessible way to step-by-step set up your own online store, avoiding typical pitfalls and mistakes.
What do you need to start an online store?
There has never been a better time to start an online business than now. Anyone with a computer can start a business within minutes, without needing any special skills.
How to set up an online store, you need three things:
- An idea for a domain name (this will be the name of your online store, e.g., business.cba.pl).
- Hosting account (a place where your website will “live” on the internet).
- 30-40 minutes of undivided attention.
Yes, it’s really that simple!
You can launch your own online store with WordPress in less than 30 minutes, and we’ll guide you through every step of this process.
Choosing the right domain name is crucial because it will represent your brand on the internet and help potential customers find you easily.
Hosting is the foundation of your site, so it’s worth choosing a reliable solution that will ensure the speed and security of your store’s operation.
We strongly recommend Hostinger.com.pl!
Allocating half an hour of your time to set up the store may seem like a little, but it’s during this time that you will make crucial decisions about the appearance and functionality of your store.
Setting up an online store with WordPress is not only fast but also intuitive. Thanks to the huge number of available plugins and templates, anyone can customize the store to their own needs and preferences, even without deep technical knowledge.
Remember, success in the e-commerce world depends not only on how you start but also on how you engage your customers and adapt to changing market trends.
Step 1. Choose an e-commerce platform – How to set up an online store?
The most common mistake users make is choosing the wrong platform for their online store.
Two popular eCommerce platforms we recommend are WordPress combined with WooCommerce. With them, you have a chance to create a flexible store tailored to your needs. Although it requires some configuration at the beginning, it’s an investment that pays off in the long run.
What’s important! This is a completely free set that we can use freely. It also offers a lot of additional free plugins.
WordPress is the most popular content management system, and WooCommerce is the world’s largest eCommerce platform.
In this guide, we’ll show you how to step-by-step launch an online store in WordPress using WooCommerce on one of the best hosting for WooCommerce.
To start your eCommerce store, you need a domain name, web hosting, and an SSL certificate.
The domain name is the address of your website on the internet. It’s what users type into their browsers to reach your site (e.g., google.com or business.cba.pl).
Web hosting is where your eCommerce site “lives” on the internet. It’s the home of your site on the web. Every website on the internet needs hosting.
The SSL certificate adds an extra layer of security to your site, allowing you to accept sensitive information such as credit card numbers and other personal data. It’s required to accept payments on your eCommerce site.
Usually, a domain name, web hosting, and SSL certificate can cost several hundred złotych together. That’s quite a lot if you’re just starting out.
In our recommended company – Hostinger.com.pl – with the hosting price, you get a free domain and SSL certificate. And the whole thing costs about 200 zł per year, so it’s a very low cost for maintaining an online store!
Let’s now proceed to purchase your domain + hosting + SSL.
1. Go to the HOSTINGER.COM.PL website – select Hosting >> Web Hosting from the top menu.

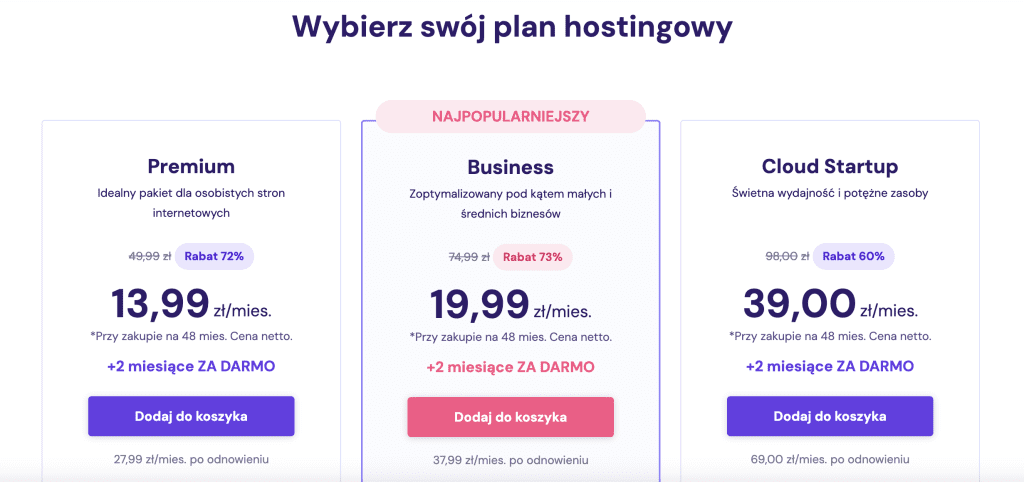
2. On the next page, scroll down to choose from hosting packages. There should be 3 to choose from: Premium, Business, and Cloud Startup. For starters, PREMIUM will be entirely sufficient.
3. On the next subpage, you’ll have 3 steps to fill out:
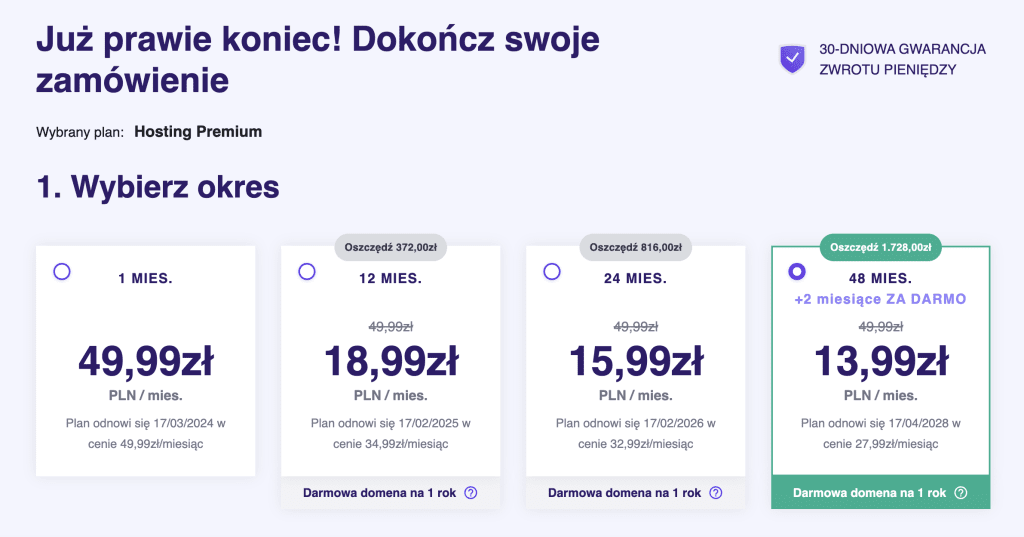
(1) – Period – for how long you want to purchase hosting. The longer, the cheaper it is on a monthly basis. It’s worth remembering that you’ll only get a free domain if you purchase the service for a year or longer. There’s no free domain in monthly packages.
(2) – Create your account – it’s worth providing your email address and password here to create an account immediately.
(3) – Payment method – you have various payment options to choose from: Paypal, credit card, Przelewy24 (including BLIK), or even cryptocurrencies.
In the last step, simply fill in the details and proceed.
And that’s all! Now we proceed to install WordPress and WooCommerce on Hostinger. After paying for the order, log in to your account.
Step 2. How to set up an online store with WordPress + WooCommerce?
If you’ve just purchased Hosting, you’ll still need to go through the configurator.
Set a password for your account and confirm the provided email address by clicking on the activation link in the email:

Proceed to configure hosting – on the main page, click on the SETUP button.

Then choose “START NOW”.
The configurator may try to ask various questions to help, you can skip all of it. At the bottom, click on “Skip, I don’t want personalized experience”.
You can also skip the next step: “Skip create an empty website”.

In the next step, connect the domain to hosting. If you purchased a hosting account for more than 1 year, you have the option to get the domain for free. To do this, choose CLAIM A FREE DOMAIN.

Then enter the domain name, check if it’s available, if so, proceed.

In the next step, you’ll need to provide data to register the domain.
Finally, click CONTROL PANEL and “Manage Site”.
At this point, you’ll be taken to the management panel at Hosting. Find the AUTO INSTALLER option and go there.

Next, we can choose WooCommerce right away – WordPress will be automatically installed on our domain along with the e-commerce module, WooCommerce.

After choosing this option, enter the following data:
- Website title – the title of the website.
- Administrator email – the address where you’ll receive notifications or the possibility of resetting your password.
- username and password – username and password for logging into the website / online store management panel.
- Advanced – for more advanced users – generally, you don’t need to enter anything there.
Finally, log in to the CMS panel, i.e., go to www.yourdomain.com/wp-admin at your domain or go to the Dashboard in hosting and select “Edit Website”.

Step 3. Configure Your WordPress Site
Let’s start by configuring your site on WordPress.
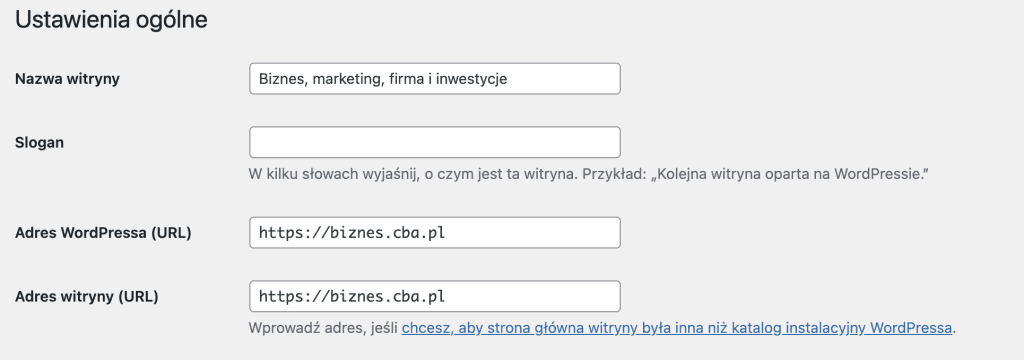
First, visit the Settings » General tab to set the title of your WordPress site and the subtitle. If you’re satisfied with the previously selected site title, you don’t need to change it.
The subtitle is optional, so don’t worry if you don’t have an idea for it right away.
Set up HTTPS to use SSL
Your WordPress hosting package included a free SSL certificate. This certificate is pre-installed for your domain name. However, your WordPress site needs to be configured to load via https instead of http.
In the Settings » General tab, you need to change the WordPress address (URL) and the site address (URL) to use https instead of http.
Use HTTPS for your WordPress store address. Don’t forget to scroll down the page and click the ‘Save Changes’ button to save your settings.
Step 4. How to set up an online store? How to Set Up WooCommerce?
WooCommerce is the best tool available on the market for building online stores. It’s based on WordPress, combining WordPress’s flexibility with the ability to sell any type of product you want.
If you’re following our guide, the plugin should already be installed. However, make sure everything is okay.
All you need to do is go to the Plugins » Add New tab and search for “WooCommerce”. In the search results, click the “Install Now” button next to the plugin.
WordPress will now download and automatically install the WooCommerce plugin for you.
Wait for the plugin to finish downloading, then click the “Activate” button to proceed.
After activation, WooCommerce will launch the setup wizard, and you’ll see the WooCommerce welcome screen.
This wizard will guide you through important WooCommerce settings.
WooCommerce Plugin Configuration
First, you need to provide basic information about your online store, such as address, country, and region. If you’re a retailer, you can add store location information as the address.
Then click the ‘Continue’ button to proceed to the next step.
Next, you’ll be asked to select the industry for your store. You can choose the industry closest to the type of store you want to create.
After selecting the industry, click ‘Continue’.
Next, you’ll be asked about the types of products you’ll be selling in your store. For example, if your products require shipping, you can select ‘Physical Products’.
You can also choose multiple product types.
For example, you can select both Physical Products and Downloadable Files. Don’t worry about selling different types of products. You can choose the product type for each product you add.
Click the ‘Continue’ button.
Next, you’ll be asked to provide business details such as the number of products you plan to sell and whether you sell products elsewhere. You can choose the option ‘I don’t have any products yet’ and select ‘No’ for the other option.
Step 5. Setting Up Payments for Your Online Store
How to start an online store? For the Polish market, we recommend focusing on payment methods that are popular and widely accepted in Poland. You can consider using payment gateways such as Przelewy24, PayU, Dotpay, or BLIK, which are well known to Polish consumers.
To configure them in WooCommerce, go to the WooCommerce » Settings tab and navigate to the ‘Payments’ section. Here, you’ll see a list of available payment methods that you can enable for your store.
For each gateway, such as Przelewy24 or PayU, the configuration process may require entering specific information, such as API keys, which you’ll receive after creating an account with the payment service. This will connect your store directly to the chosen payment gateway, allowing customers to pay in their preferred way.
Don’t forget about the option to use BLIK, which is very popular among Polish users due to the speed and convenience of transactions. Check if your chosen payment platform supports BLIK to enable customers to use this method.
After configuring the payment methods, it’s important to click ‘Save changes’ to secure the entered information.
Remember that choosing the right payment gateways is key to increasing conversions in your store. Adapting payment methods to the preferences of Polish consumers can significantly influence the final purchasing decision.
Step 6. Adding Products to Your Online Store
Let’s move on to adding the first product to your online store.
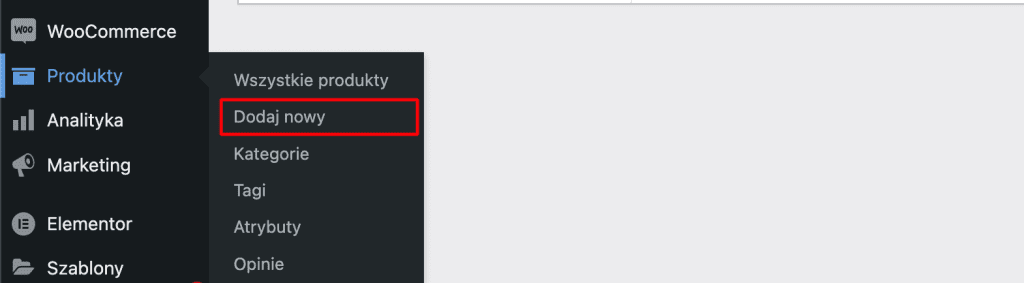
Visit the CMS management page – Products » Add New to add a new product.
First, provide a name for your product, and then a detailed description.
In the right column, you’ll see the ‘Product categories’ field. Click ‘+ Add new category’ to create a category for this product. This will make it easier for you and your customers to sort and browse products.
Scroll down a bit, and you’ll come across the ‘Product data’ field.
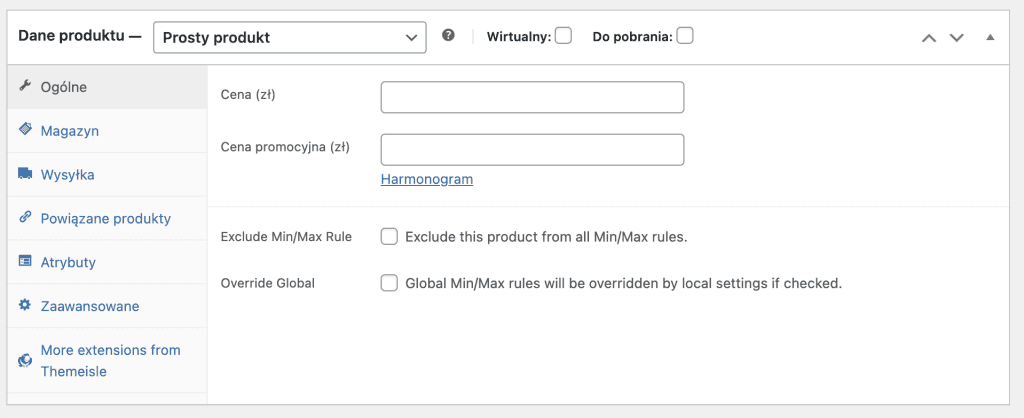
This is where you’ll enter information related to the product, such as price, stock status, shipping, etc.
Below the product data field is a place to add a short product description.
These product descriptions will be used when users browse multiple products on one page.
Finally, in the right column, you’ll find a place to add the main product image and product gallery.
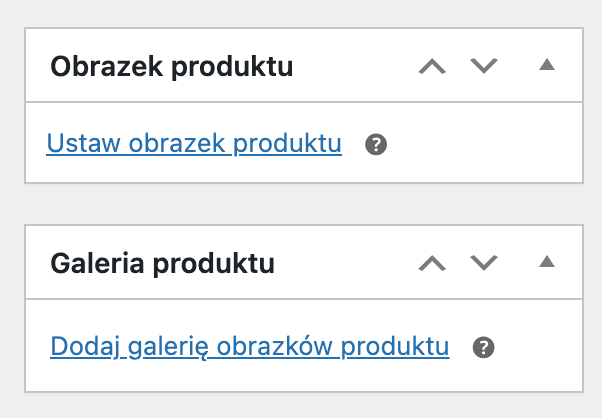
Now all you need to do is add images that you think best showcase your products.
Once you’re satisfied with all the product information you’ve added, you can click the ‘Publish’ button to make the product appear on your site.
Repeat the process to add more products if needed.
Remember, carefully crafted product images and thoughtful descriptions can significantly increase the appeal of your offerings and encourage customers to make a purchase. It’s also good practice to regularly update your offerings and tailor them to seasonal trends and customer preferences to keep your online store fresh and engaging.
Step 7. Choose and Customize Your WordPress Theme
Themes determine how your WordPress site looks to visitors. For WooCommerce stores, they also control how your products are displayed.
There are thousands of paid and free WordPress themes available that can help you create a stunning online presence.
However, not all WordPress themes are designed specifically for eCommerce stores. We’ve selected a few of the best WooCommerce themes for you to choose from.
After installing a WooCommerce theme, you can customize its appearance to suit your needs.
If you’re using a classic theme, go to the Appearance » Customize tab. This will launch the theme’s Customizer, where you can change various theme settings.
Most modern WooCommerce themes offer various customization options and are designed to work on both desktop and mobile devices.
If you choose a block-based theme, you can follow our guide on how to use the WordPress full site editor.
When choosing a theme, it’s worth considering not only its appearance but also its functionality and ease of customization. A well-matched theme to your store’s needs can significantly improve user experience and contribute to increased sales. Remember that changing a theme is not just a matter of aesthetics but also a way to improve navigation and accessibility of your store for customers.
FAQ – how to start an online store?
Shop owners use various methods to source products. Some sell items such as software, digital art, music, and other downloadable products. Others source products from local or foreign suppliers through online markets like Alibaba or AliExpress.
Yes, some eCommerce platforms offer limited free trials so you can start an online store for free, but you will need to pay after the trial period ends. Although WooCommerce itself is free, you will need a domain name and hosting account to run it, which comes with costs.
Yes, for example, you can create an online store using dropshipping plugins, create an Amazon affiliate store, or create a marketplace similar to eBay. You can also use the same online store to sell both external products and your own.
Depending on your region, you may be required to add sales tax, VAT, or other taxes. WooCommerce allows you to add taxes by enabling them in the Settings » WooCommerce page. From there, you can also go to the Shipping tab and create different shipping zones, add shipping rates, set flat shipping rates, and more.